Monthly Archives: November 2011

12 Crafts of Christmas {You & Me Books}

When Carter and Lydia were little-little, I wrote monthly letters to them.
(Unfortunately, I haven’t kept that up with that.)

When they got a little older, I had books that I made called:
“The World According to Carter” (or Lydia, as the case may be).
Whenever they would say something amusing or interesting, I’d jot it down in there.

(I’ve done neither for Asa or Anna Alden.
I have scraps of paper shoved in a box with notes.
That has to count for something, right?)

And then somewhere out on the wild, wild web I saw an idea that I loved:
A mom talked about starting a shared journal with her teenage daughter.
Things they couldn’t say a loud somehow managed to find its way into the notebook.
When I saw that I decided to tuck that away into my memory bank for ‘someday’.

That is…until last week.
I was cleaning out a big box of papers that all belonged to my children.
Mixed in with the lists of sight words and hoot owl art work,
I found hundreds upon hundreds of little slips of paper.
Most of them said To: (Insert Family Member’s Name Here)

My children, like most children, love to create masterpieces and do.not. want to throw anything away.
I want to keep some of their art, but oh, my!  That’s a looooot of paper!
So while I was sitting in the middle of the floor and sorting papers,
I decided it would be nice to have one spot for all this.

And I remembered the mother-daughter notebook.
I could make a notebook for each child and they could write or draw in it to me.
And I, too, could write or draw in it to them.

So I picked up some composition notebooks, pulled out my scrapbook paper and mod podge and got to work!
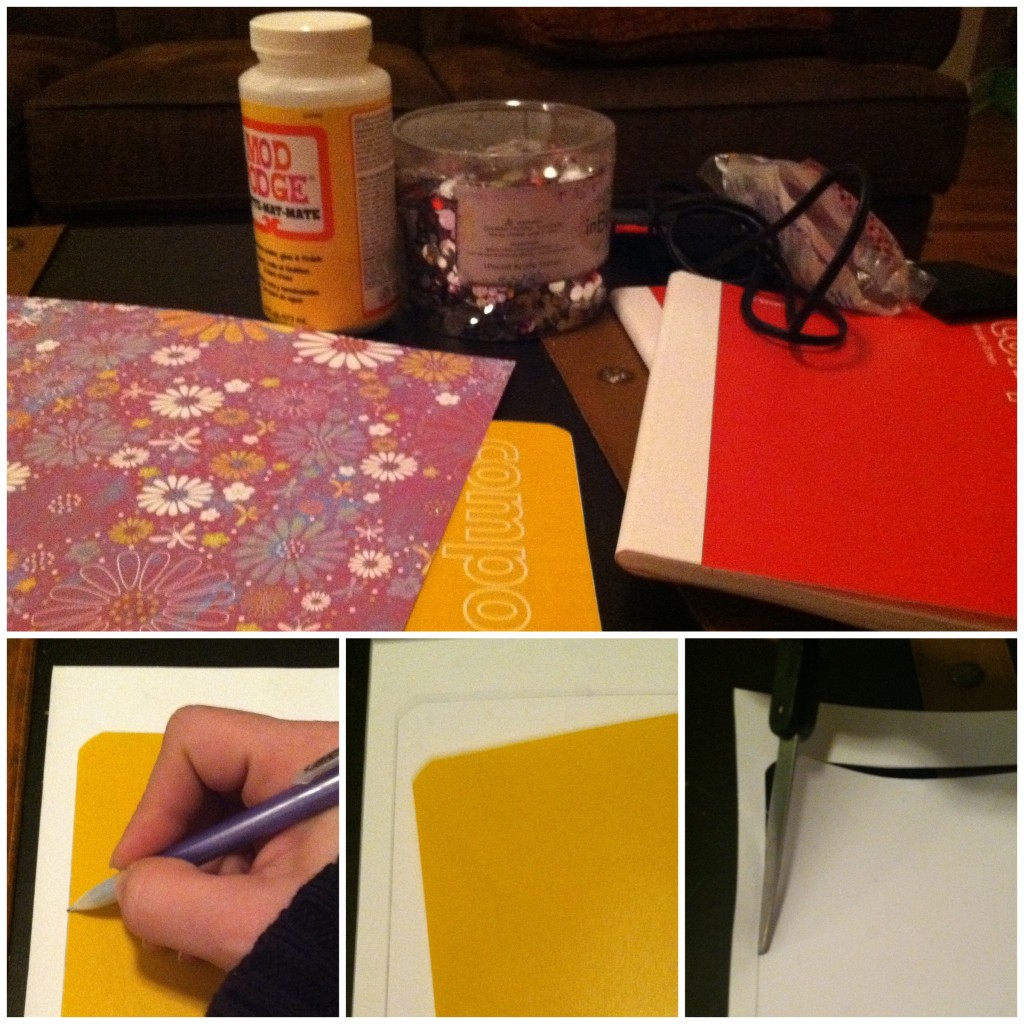
I had a 12×12 sheet of scrapbook paper that wouldn’t cover the front and the back, but I wanted to cover the spine, too.
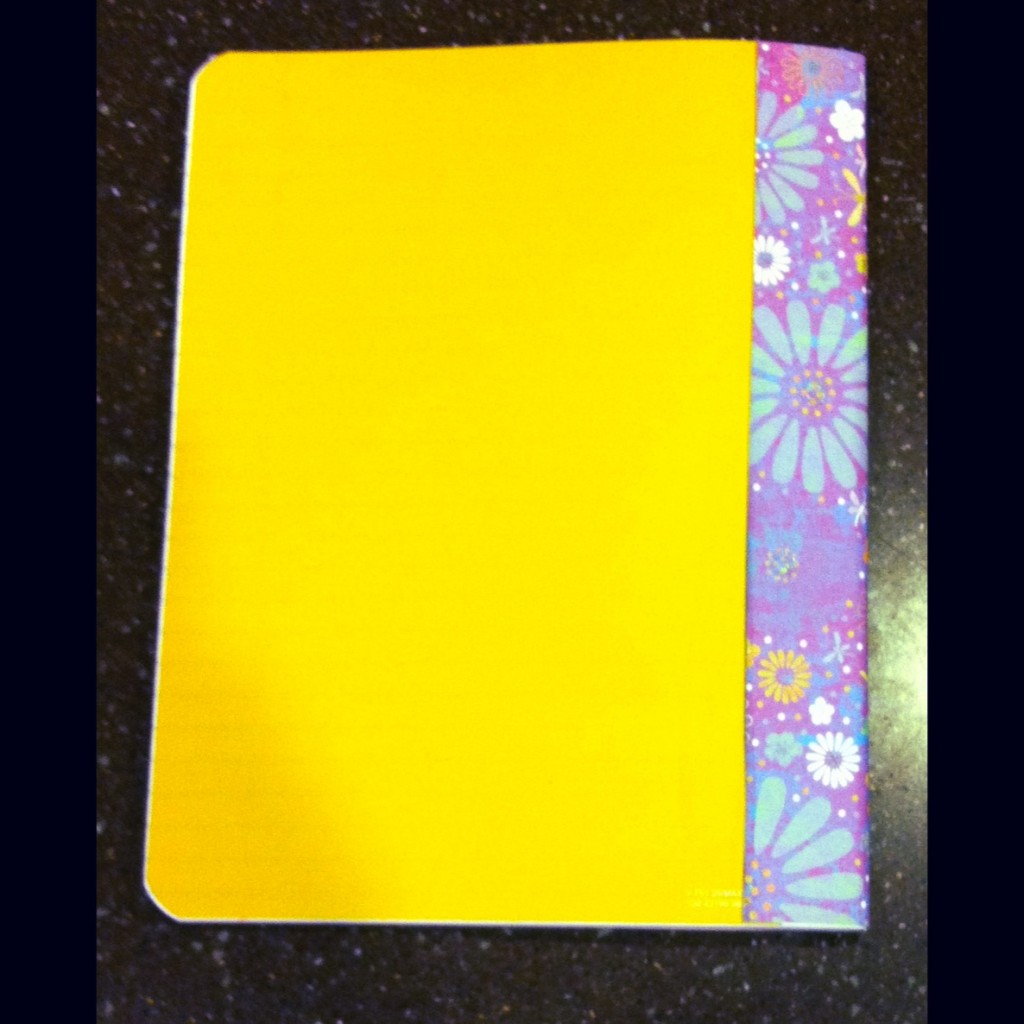
So I cut it so that the top is completely covered and the back is partially covered(seen below).
Then I cut it out, slapped down a layer of mod podge(you could probably use regular glue) and smoothed out the paper.
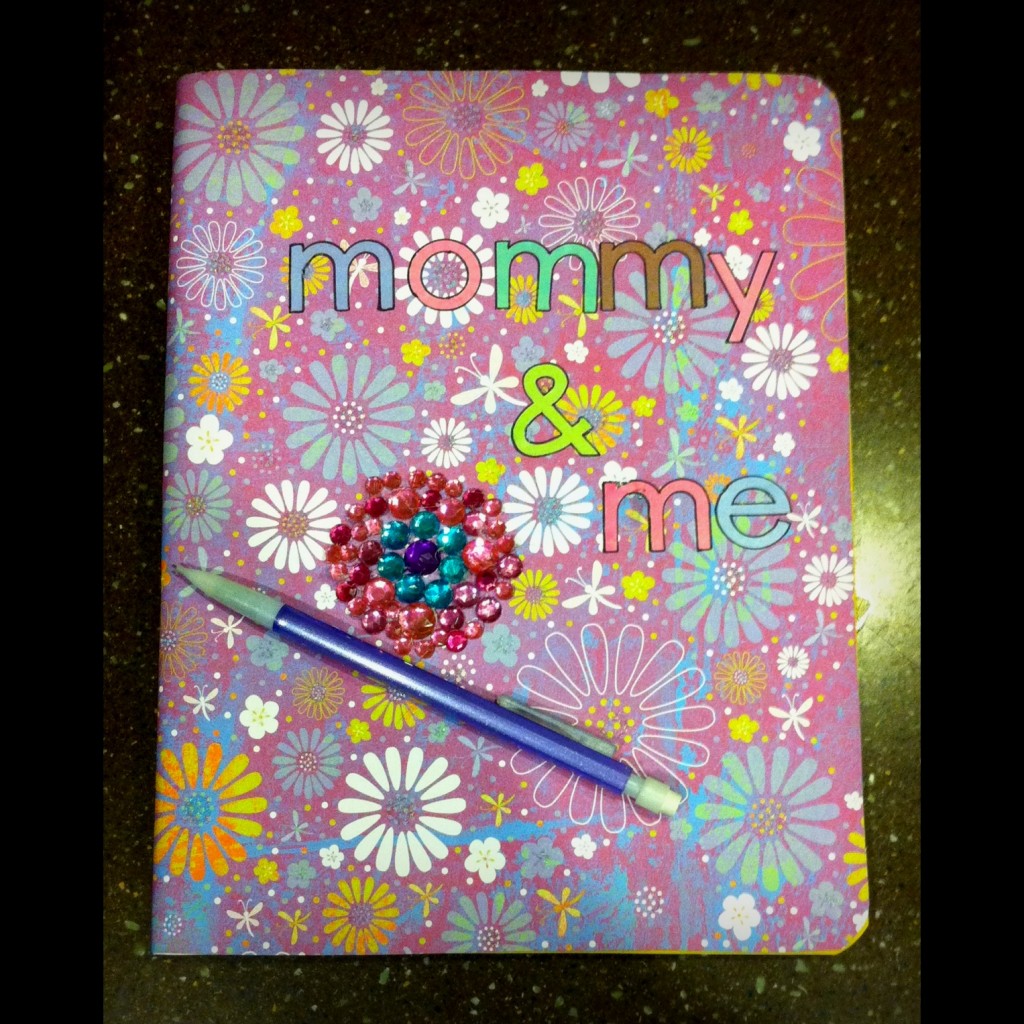
I wanted to label my book, so I used some scrapbook stickers to spell out “mommy & me”.
But the letters were blending in a little too much with the paper so I outlined them with a fine tipped black sharpie.

And then because my Lydia is the Bling Queen, I decided to add some jewels.
All I did was hot glue them on (and burn my finger tip once).
I can’t wait to see what stories will be told and pictures will be drawn.
I am so excited about this idea!

And I’m actually considering making a few for some friends, too.
You could mail it back and forth…like old-fashioned pen pals!  🙂
(It’s cheesy, but you know you love it, too.)

*******
12 Crafts of Christmas 2011
1. Personalized Necklaces
2. Button and Lego Wall Art
3. Personalized ClipBoards
4. Fabric Covered Wire(Wall Art) 
5. Stationary
6. You & Me Books
7. Personalized Welcome Mat
8. Personalized Dessert Carrier
9. Kid’s Artwork Cup
10. Ornaments
11. Sewing Tutorials
12. Photo Display Block

12 Crafts of Christmas {Stationary}

I really love getting letters in the mail.
Once upon a time I was really great about sending letters in the mail.
Now…I just cannot manage to get it done.

But I loooove stationary and my once very full stash has dwindled to nearly nothing.

So here are a few that I’ve been working on:

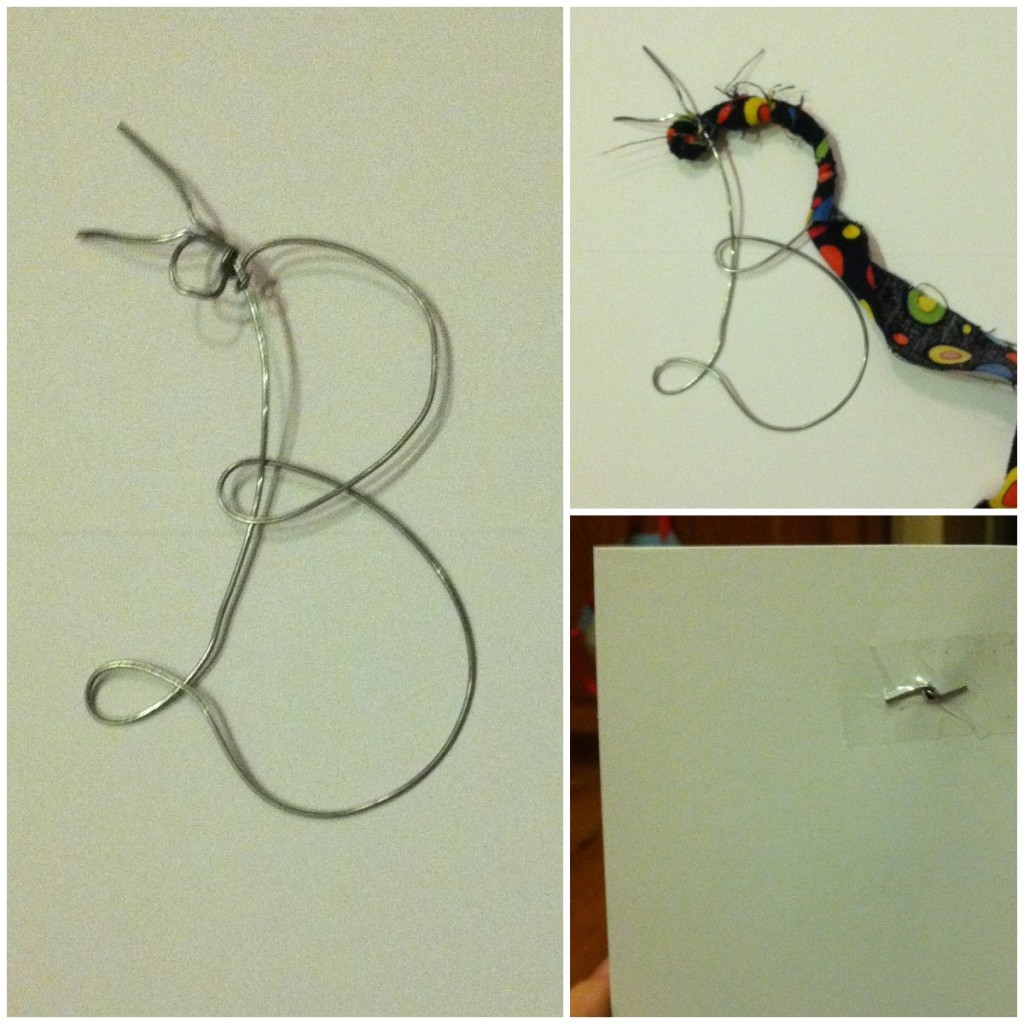
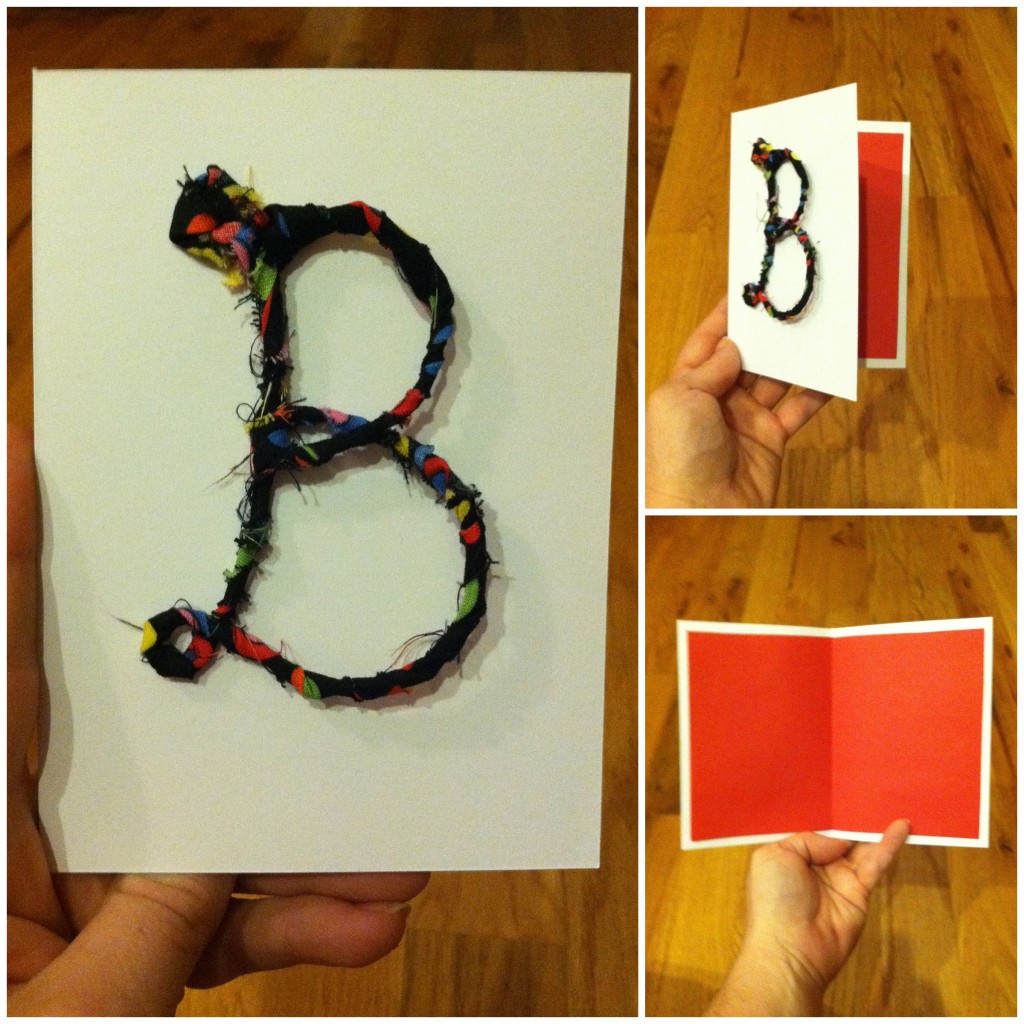
I fell so in love with wrapped wire letters that I brought it over to stationary.


First I used a smaller gauge wire and made my letter, leaving a little bit of the wire sticking out.
After wrapping the letter, I punched a tiny hole in the card and inserted the uncovered wire.
Folding it down, I secured it with tape.
Since I didn’t want the card recipient to see the taped wire, I used red cardstock to make a liner.

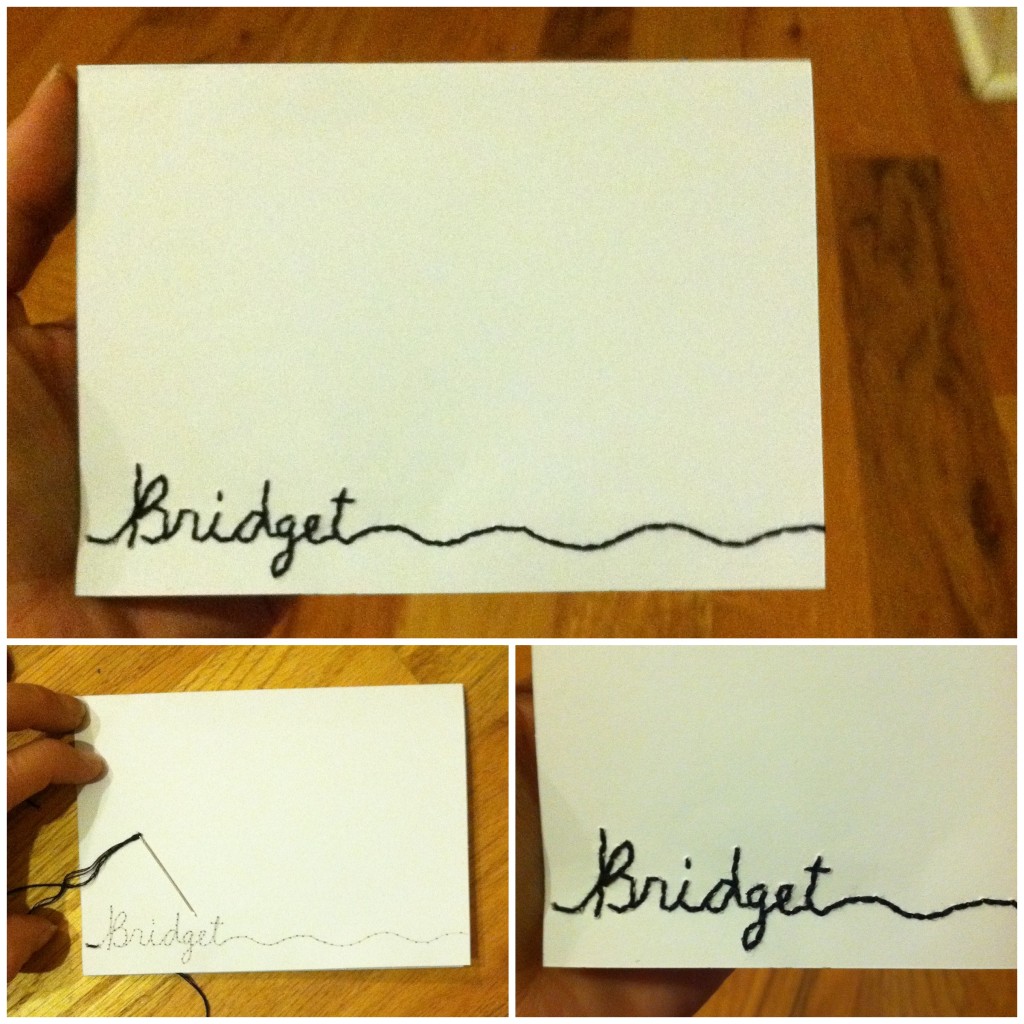
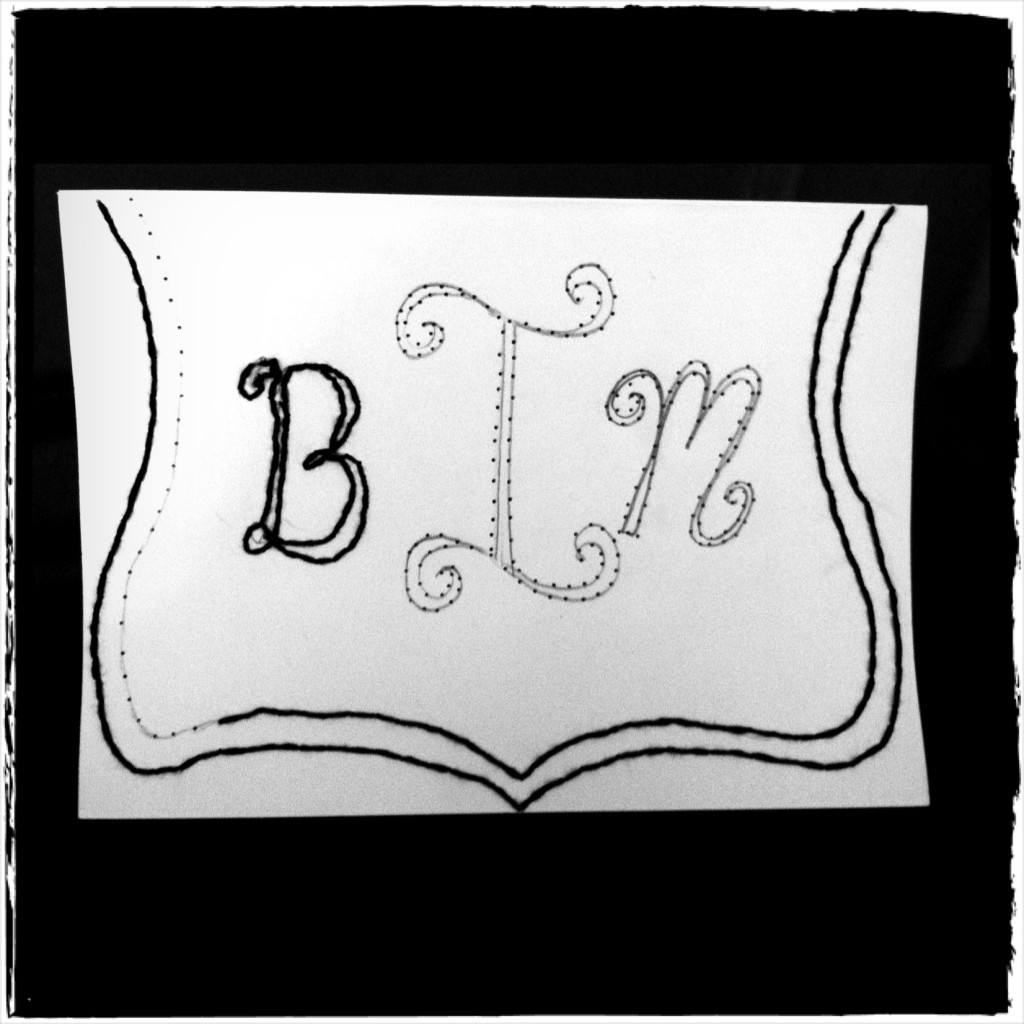
And I recently also fell in love with hand embroidered paper.  It’s super easy.
For both of the ones you see below, I drew the design by free hand in pencil,
but you could easily print out a design from your computer.
(You’d probably want to print in light gray, not black.)

I took a sharp tipped needle and pre-made the holes.
Then I simply sewed up the line with embroidery thread.
(What you see on both of these is 3 strands of thread.)
I obviously haven’t finished the bottom one yet.  🙂


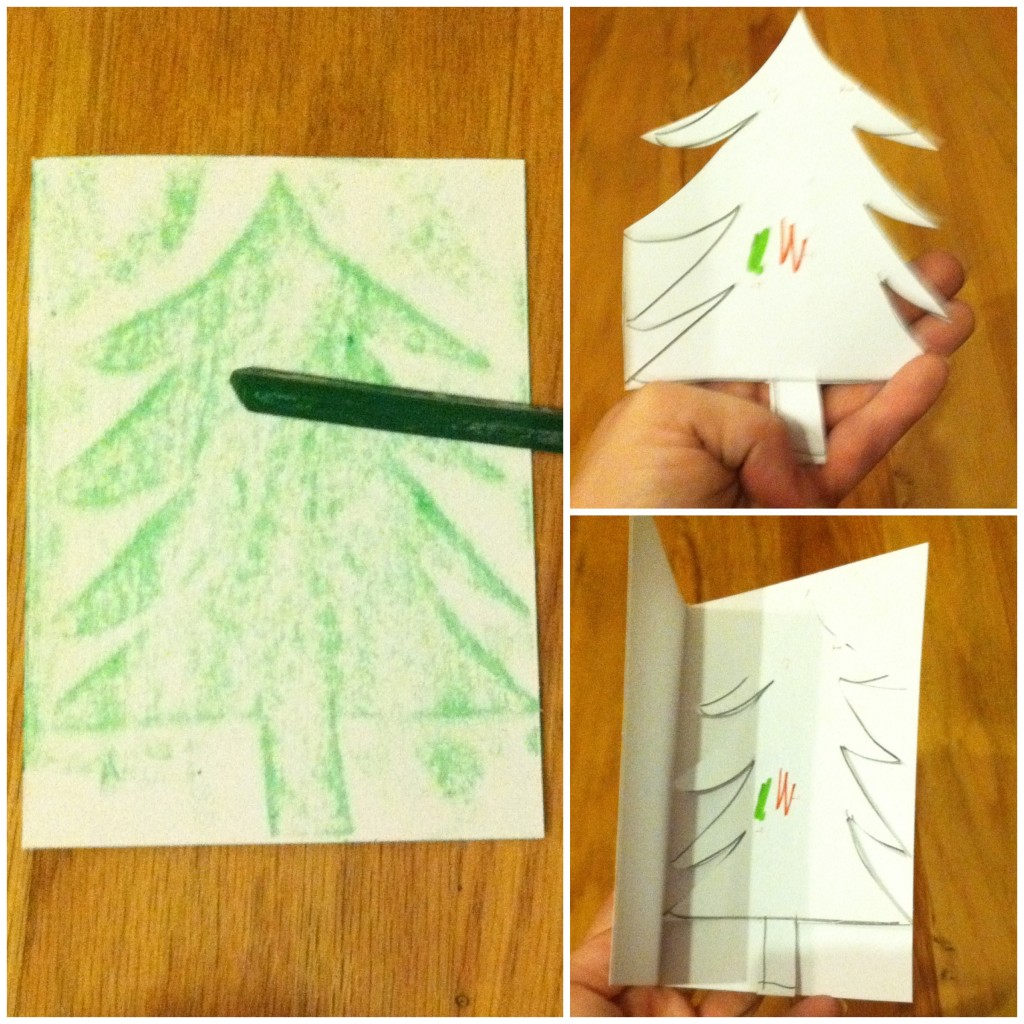
And I because my kids like to craft as much as I do, I decided to do one that was kid-friendly.
Carter and Lydia fell in love with leaf rubbings this fall. (And, honestly, I’d forgotten how fun it could be!)
And so I decided to cut out a Christmas shape and do a rubbing of it.
(I used a tree for this one, but plan on using other shapes, too – maybe Santa silhouette or stocking or reindeer.)

Suuuuuper easy once you cut out your shape.
Don’t feel confident that you can draw the shape you want?
Google “Christmas tree coloring sheet” and you’ll get tons of line-drawn options that are perfect for this!
Print it out from your computer, cut around the edges and color away!


*******
12 Crafts of Christmas 2011
1. Personalized Necklaces
2. Button and Lego Wall Art
3. Personalized ClipBoards
4. Fabric Covered Wire(Wall Art) 
5. Stationary
6. You & Me Books
7. Personalized Welcome Mat
8. Personalized Dessert Carrier
9. Kid’s Artwork Cup
10. Ornaments
11. Sewing Tutorials
12. Photo Display Block
12 Crafts of Christmas {Fabric-Covered Wire Art}

A while back, I saw this idea in Family Fun magazine.
I kept meaning to try it, but never ended up with the time or resources.

A few weeks after I saw it, my friend Jesse told me that she’d seen the same thing.
Only she actually made it and I just thought about making one.

So tonight I sat down and started working on these.
They don’t take long, but they are addictive!

I was planning on doing just one and ended up doing 5!

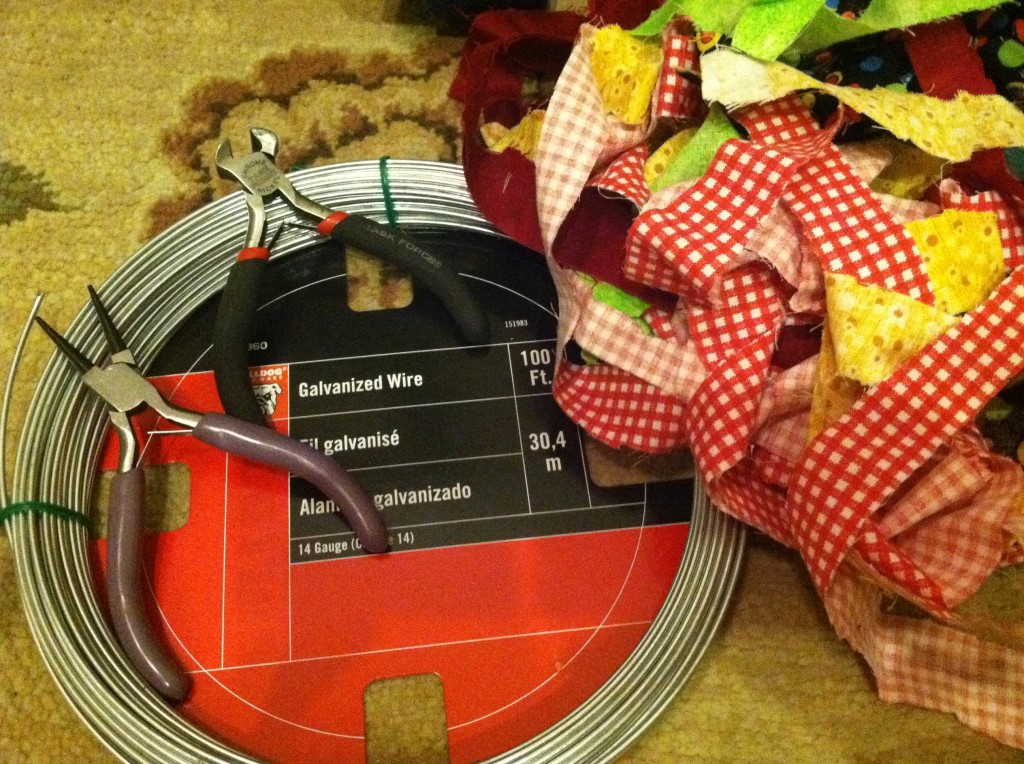
Soooo…you’ll need some kind of thick-ish wire.  (I had some 14 gauge galvanized wire left over from another project.)
A pair of wire cutters and a pair of pliers.  And fabric scraps.


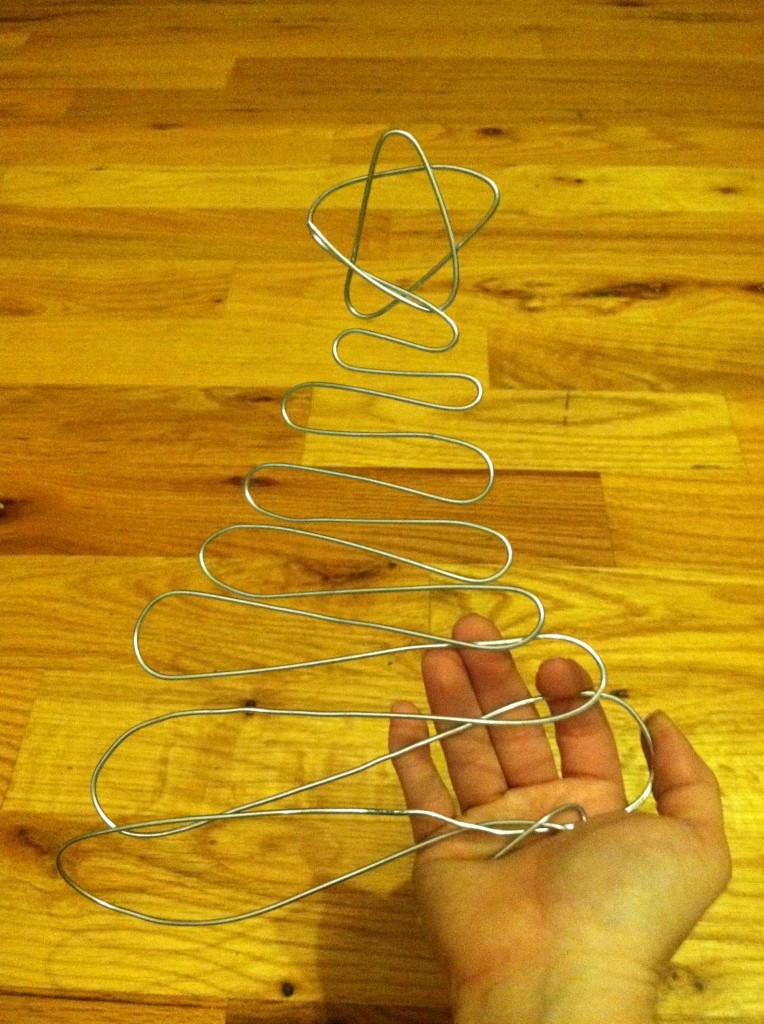
For the first one, I wanted to make something Christmas-y, so I bent the top part of the wire into a star shape and then just zig-zagged the rest of the way down.  (Mine is about 10″ tall.)

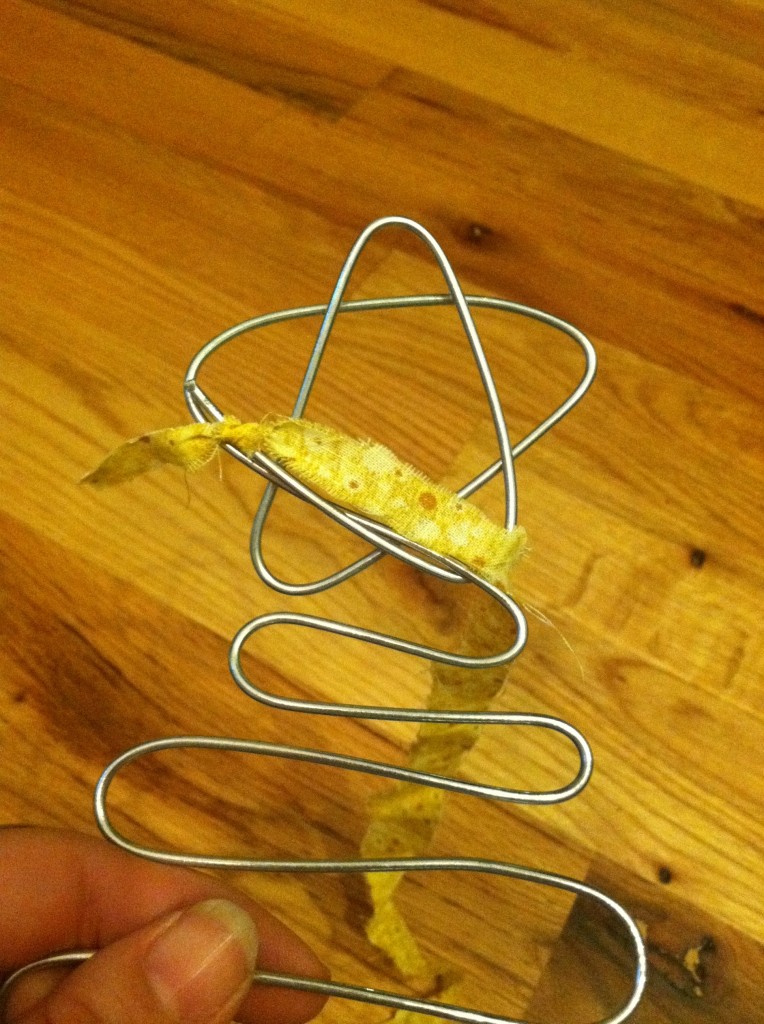
Then I tied one piece of my ribbon onto the wire and started just wrapping and wrapping and wrapping.
When you get to the end of your piece of fabric, just tie on another one and keep going (making sure to wrap up the knot you just made).

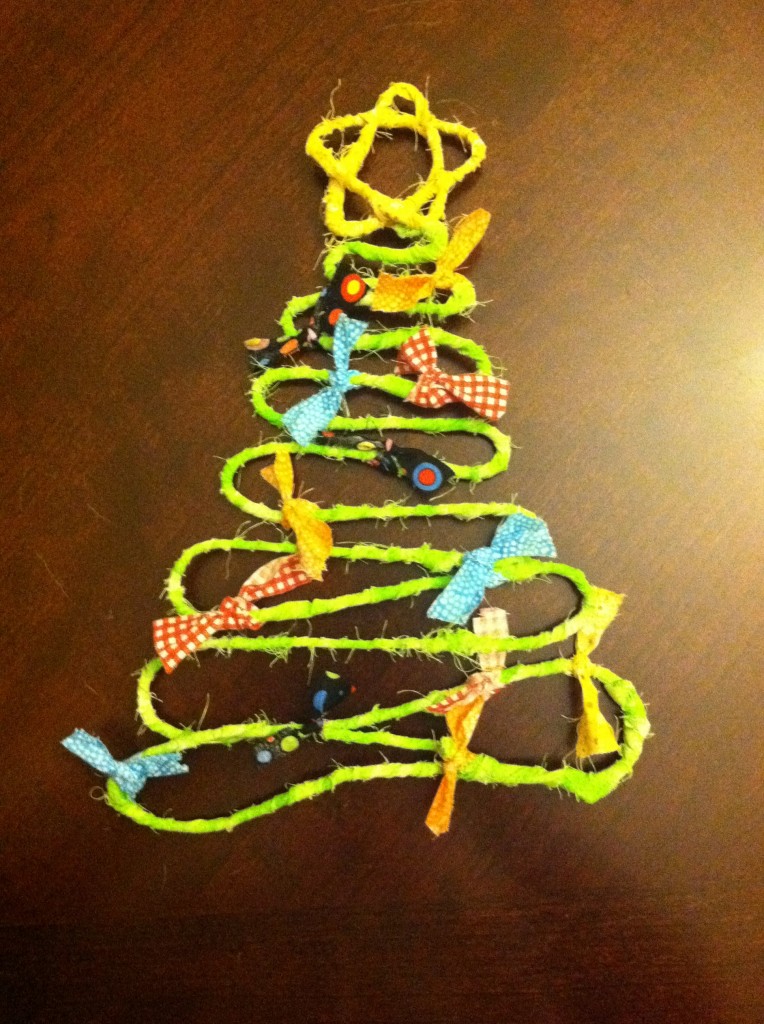
Once I had wrapped up the entire thing and tie off the end, I cut smaller bits of multi-colored fabric and added “ornaments” to my tree.

And as if it wasn’t late enough last night (about 1am), I decided that I had to make something else.
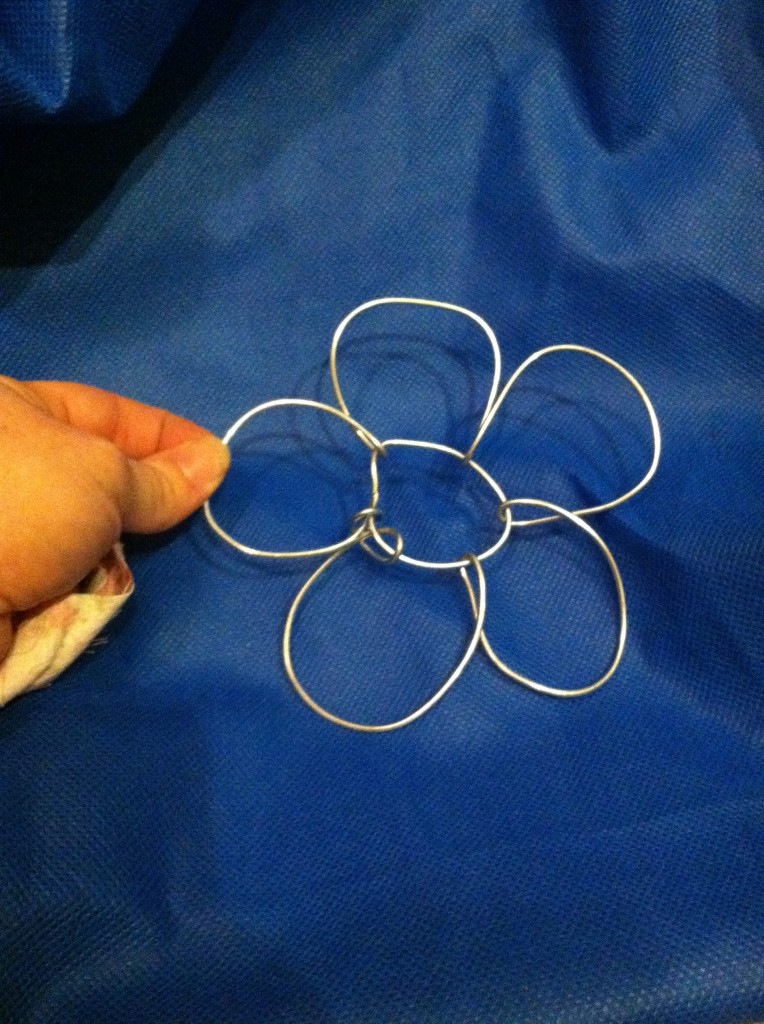
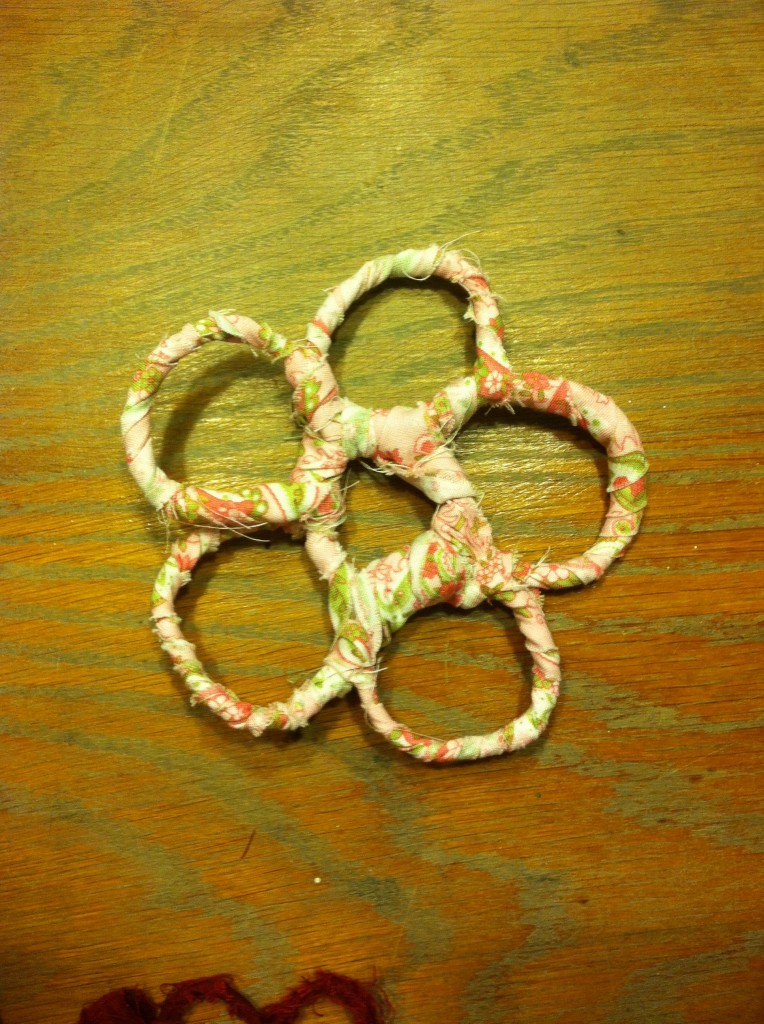
So I made a little wire flower to match Anna Alden’s room.  (I think I may make a bunch of them and put them on her walls.)


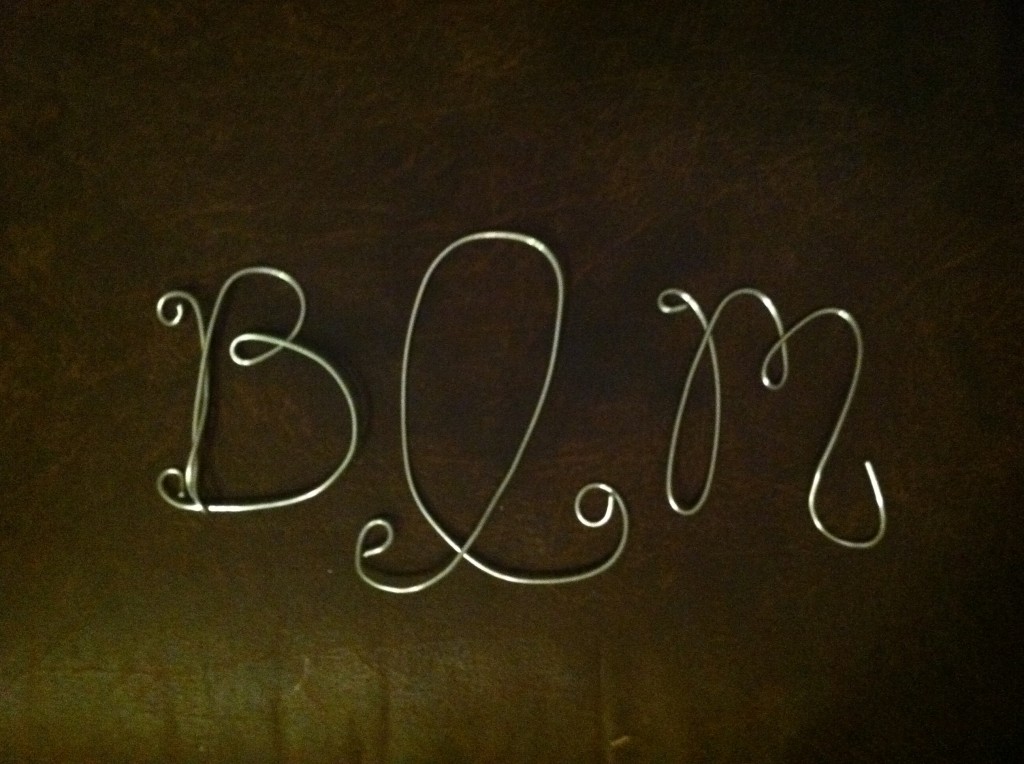
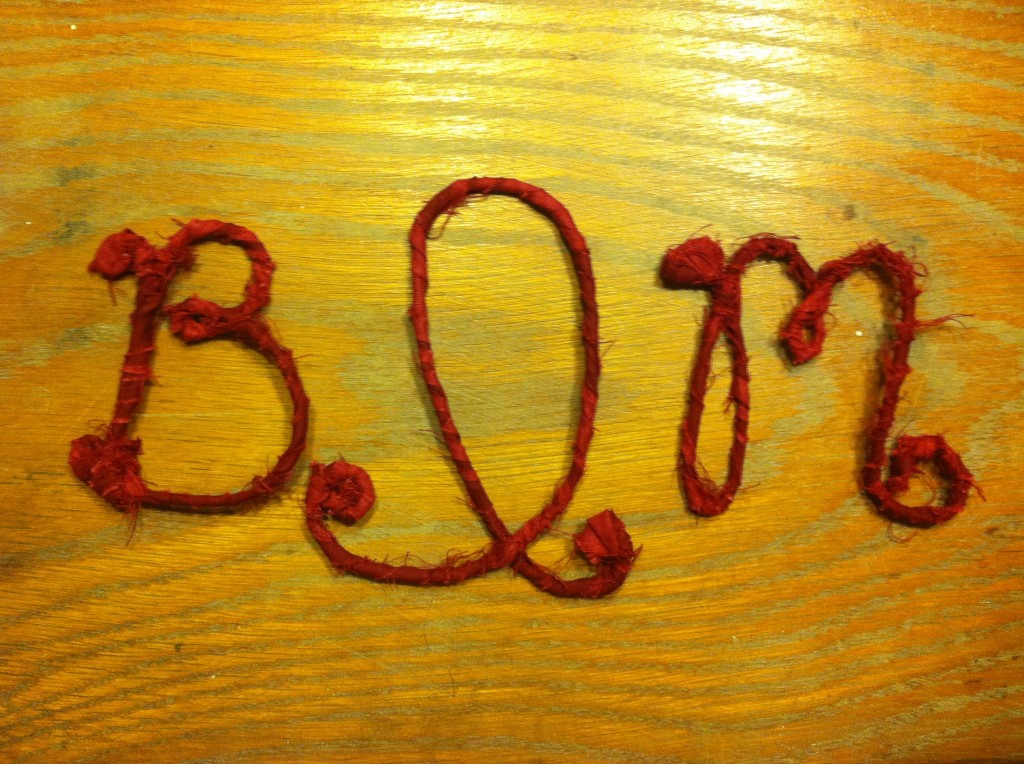
And then I was on a roll and thought, “I should make a monogram one!”
So I did:

What other designs can you think of?
I was thinking a Mickey Mouse would be cute.
Or do the whole alphabet and put it on the wall.
Gosh, y’all!  I better go buy more wire.

*******
12 Crafts of Christmas 2011
1. Personalized Necklaces
2. Button and Lego Wall Art
3. Personalized ClipBoards
4. Fabric Covered Wire(Wall Art) 
5. Stationary
6. You & Me Books
7. Personalized Welcome Mat
8. Personalized Dessert Carrier
9. Kid’s Artwork Cup
10. Ornaments
11. Sewing Tutorials

12 Crafts of Christmas {Personalized Clipboard}

Ok, so I’ll admit something to you.  This craft wasn’t nearly as easy as I thought it would be.
So I’ll show you what I did and then I’ll tell you how you should do it if you want to save a lot of time.

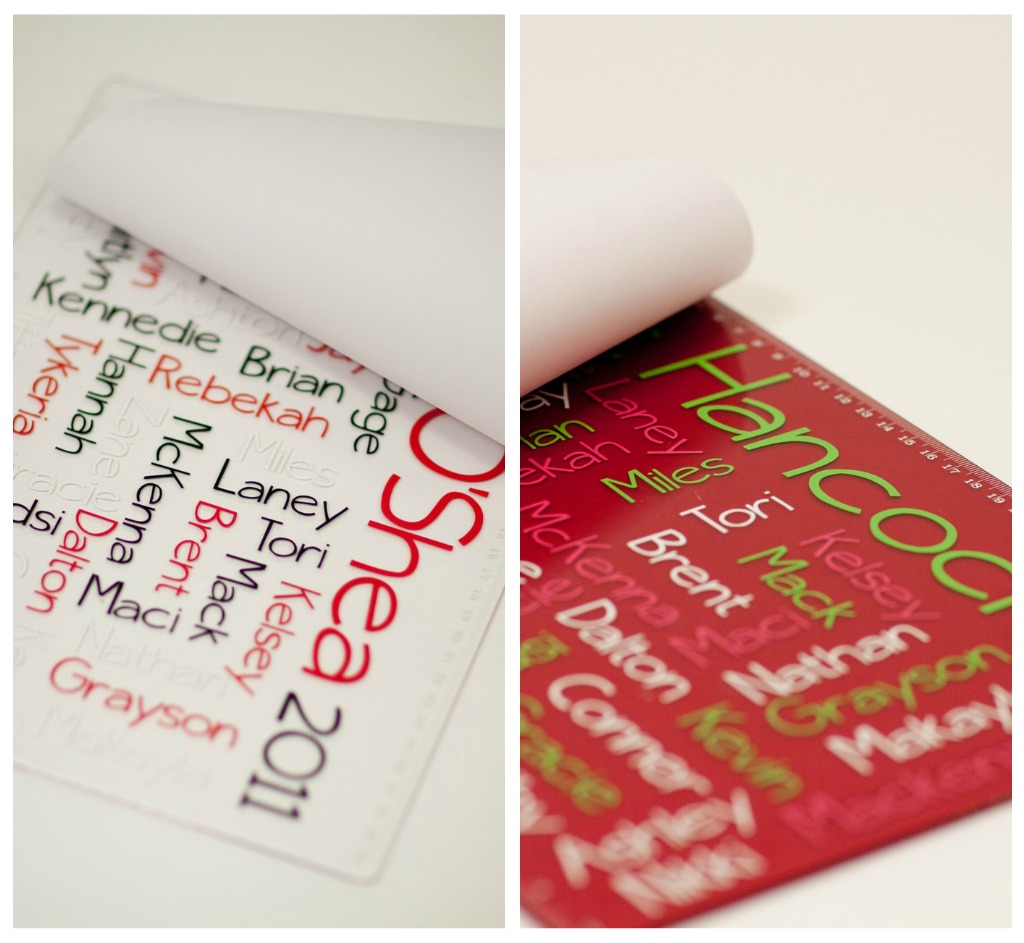
Carter had two student teachers who finished working with the kids last Friday, so I made personalized clipboards for them.

Each teacher’s name and the date are written long-ways down the side followed by the year.
And then the names of all the students they teach are listed in a ‘word cloud’.

First I went to wordle.net and used it to help me create a template for all the names.
(Click ‘Create’ at the top of that page to make one of your own.)

Once I did that I figured out which names I wanted to be which color.
For the clear clipboard, I used white, black, and red.
For the pink (which looks red in pictures), I used hot pink, lime green and white.

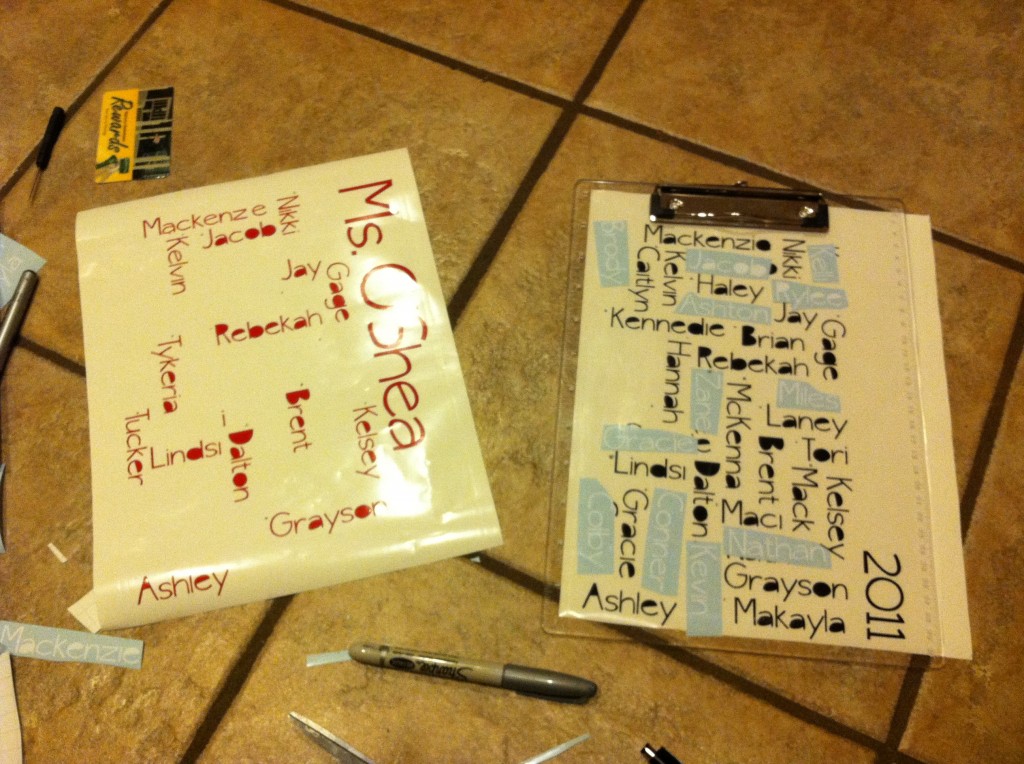
Using my Silhouette HD, I designed a wordle of my own (based on what I created on wordle.net)
And cut out three different sheets (one of each color) with all the names on them.
Then I removed and discarded the names I did not want in that color.
(This wasted a good bit of vinyl, but was a pretty big time saver when I was trying to put all the names on.
And it made it much easier to keep everything straight.

I put the names on one layer at a time:  all the red names, all the black names, all the white names.
And ta-da!  I was done!
(It doesn’t sound like it took me long, but ask Marshall.
He was dealing with 4 screaming children while I was working on it.)

Soooooo….you could make one of these with the vinyl –
I really, really love how it turned out and I will probably make more of them –
BUT I know that not everyone has access to a Silhouette machine and not everyone wants to spend forever on one project.

So here’s a faster, cheaper easier way:
You’ll need a wooden clipboard, some pretty paper, some plain coordinating paper, Mod Podge and a brush(I like foam brushes).

First you’ll start by mod podging the pretty paper onto the top of the clipboard.

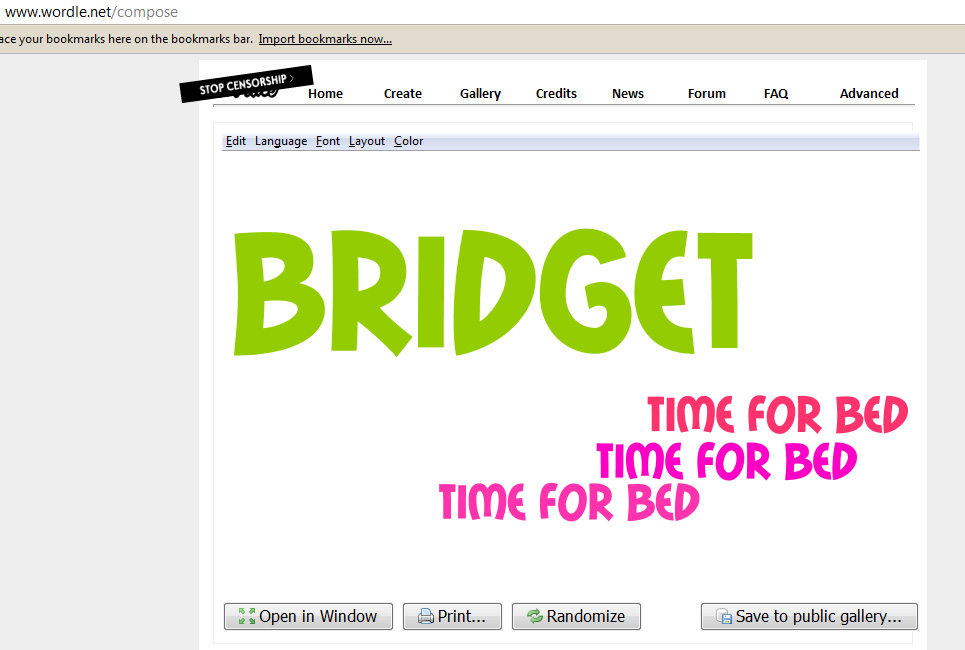
While that is drying, go to wordle.net and create a word cloud.

They do offer an advanced option if you want to weight certain words.
For example, I wanted the teacher’s name to be bigger than all of the children’s names…
so under ‘Advanced’ I typed:

Ms. Hancock: 400
2011:300
McKenna:120
Brent:120
Miles:120
etc.: 120

(The bigger the number, the bigger the word.)

Once you get the sizes right, you can play with color and layout and font.
Here’s a super quick one that I just made:

 (I’m a little tired, can ya tell?  🙂 )

And when it is perfect (or at least good enough), simply print it out.
(If I were doing it, I would print it on a light colored paper that coordinates with your decorative paper.)

Then mod podge that paper on top of the decorative paper and wait for it to dry.
I hate that I don’t have a picture to go with this, but I simply ran out of time.
If any of you make a mod podge one, send me the pic and I’ll post it!

*******
12 Crafts of Christmas 2011
1. Personalized Necklaces
2. Button and Lego Wall Art
3. Personalized ClipBoards
4. Fabric Covered Wire(Wall Art) 
5. Stationary
6. You & Me Books
7. Personalized Welcome Mat
8. Personalized Dessert Carrier
9. Kid’s Artwork Cup
10. Ornaments
11. Sewing Tutorials
12. Photo Display Block
12 Crafts of Christmas {Button and Lego Wall Art}

When I first saw these on Pinterest, I knew that I would be making at least one as a Christmas gift.
I l.o.v.e. the way they turned out.

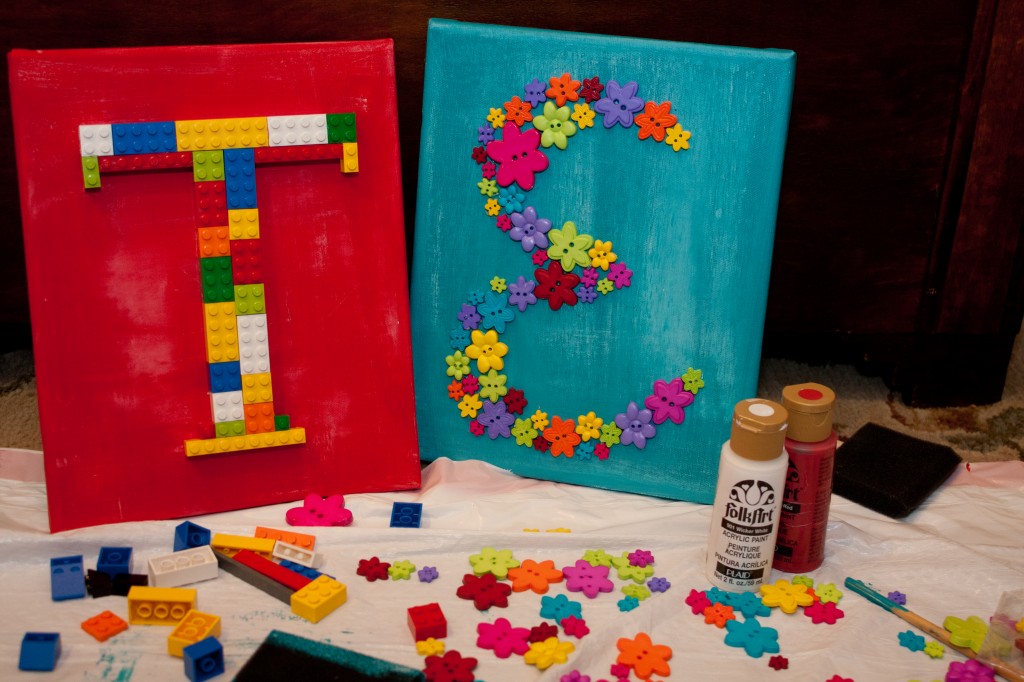
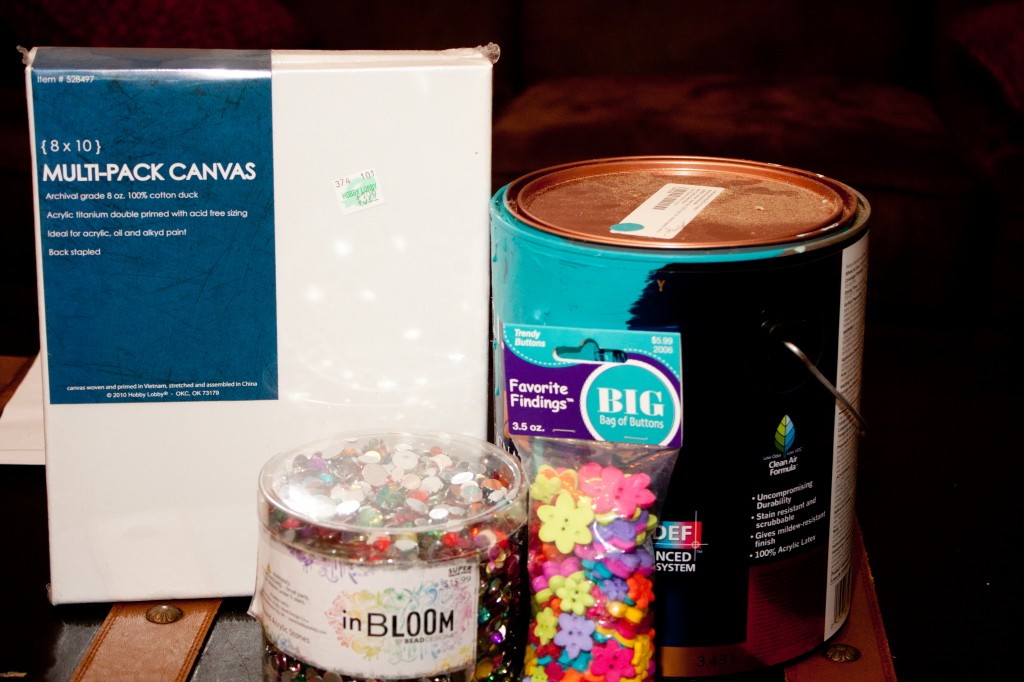
And you only need a few things: a canvas (this is 8×10), legos or buttons or beads, paint, paint brush, glue gun

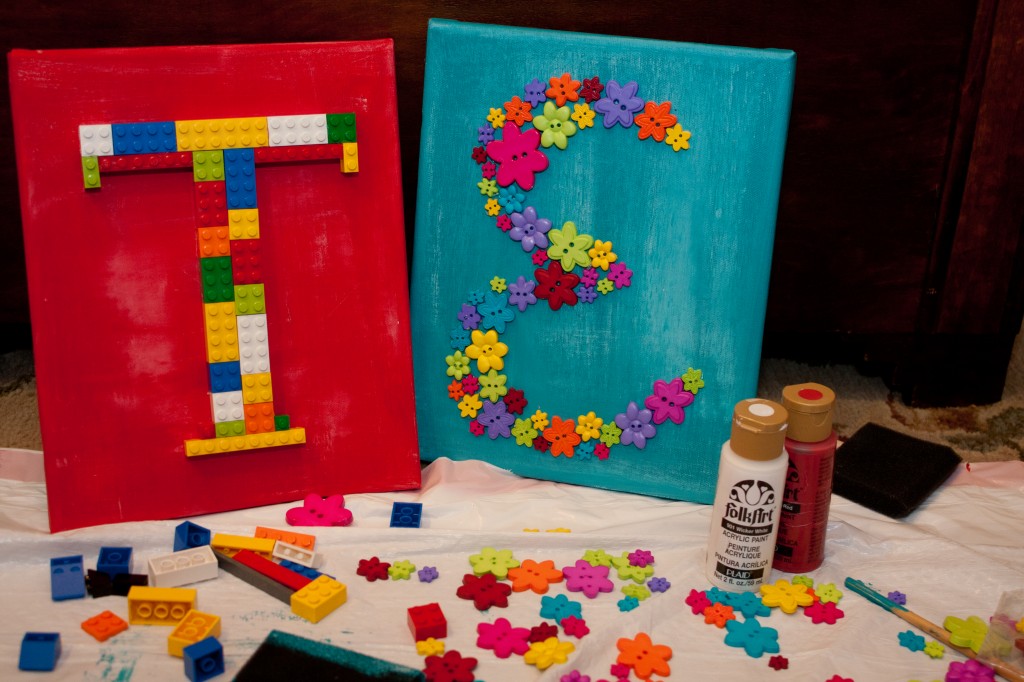
For the girl one, I used left-over paint from Carter and Lydia’s room re-do last year.
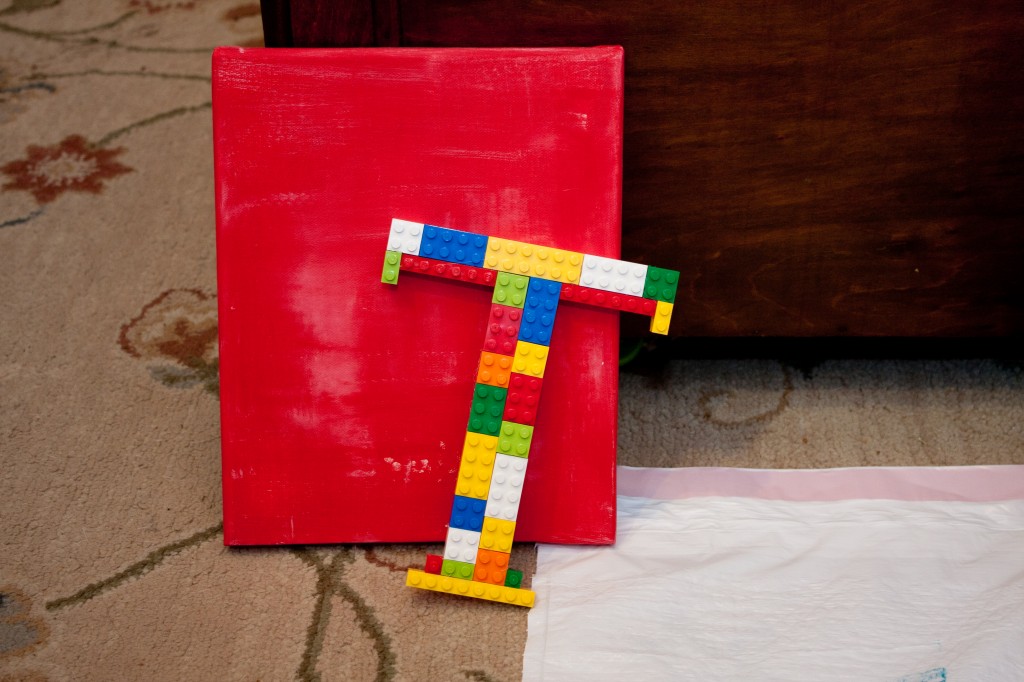
For the other one, I used some old red paint I already had.
When the paint was almost dry, I gently applied a liiiiiitle bit of white to give it a little distressed look.
(You could, of course, leave the background one solid color.)
(Or mod podge on some scrapbook paper or fabric.)

I initially only planned on doing a cutesty girl one (hence the jewels in the above picture that didn’t make the cut),
But decided that you could easily do a boy one with something like Legos or tiny plastic bugs or coins.

After the paint was completely dry, I laid out all my pieces onto the canvas.

For the flower button one,
I figured out where I wanted everything to go and I hot glued it into place.

For the lego one,
I started by gluing the legos directly to the canvas, but couldn’t get it straight enough.
So I decided to hot glue the pieces together and then glue the whole thing onto the canvas.

I am so excited about these!  Aren’t you?


What other materials might you use?

*******
12 Crafts of Christmas 2011
1. Personalized Necklaces
2. Button and Lego Wall Art
3. Personalized ClipBoards
4. Fabric Covered Wire(Wall Art) 
5. Stationary
6. You & Me Books
7. Personalized Welcome Mat
8. Personalized Dessert Carrier
9. Kid’s Artwork Cup
10. Ornaments
11. Sewing Tutorials
12. Photo Display Block
I need a sign.

The past few weeks have been a blur.
I remember snippets of time, but I get it all bobbled up in my head.
I am tired, but energetic.
I am weary, but happy.
I am busy, but it is good.

This past weekend, I had the chance to celebrate a friend’s 16th birthday.

I was there to take pictures, but also to make memories.
(And we certainly made some memories!)

As we were walking around the city and taking pictures, I started thinking about the upcoming weekend.
I’m getting ready for an friend’s wedding this weekend.  A good friend, a forever friend.
And I am photographing the entire thing.
Sometimes when I think about it, I get really excited.
Other times, it just makes me want to vomit.
Oh, good heavens…what if I royally screw this up?

I chastise myself for dipping into the well of doubt.
And I begin to give myself a little pep talk:
You know what you are doing.
It will be okay.
You are your own worst judge.
SO STOP FREAKING OUT!
You won’t be perfect, but that’s okay.
Just look at how far you’ve come.

I know, I know.
I just wish I really knew it would all be okay.
I just wish I had a sign…which is crazy because I don’t even really believe in signs and…and..and…
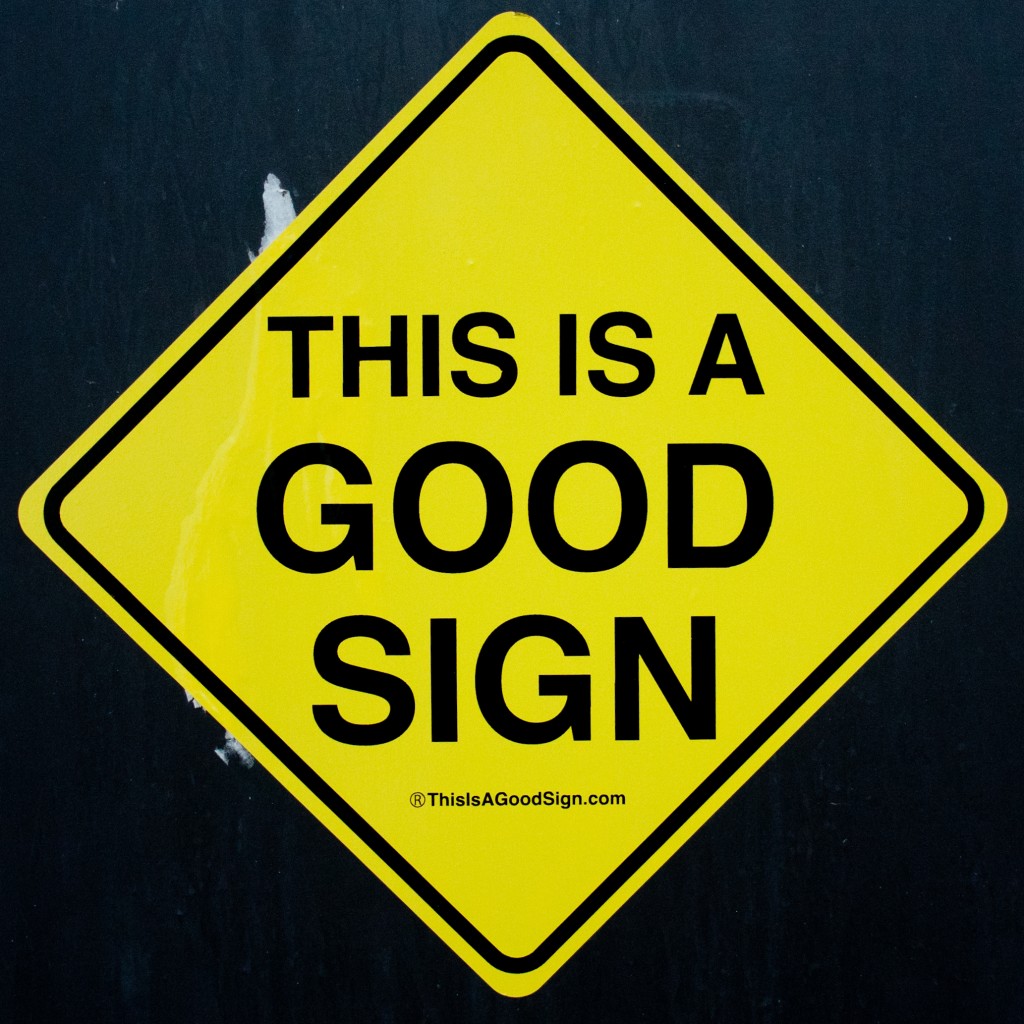
And right then (I kid you not), I looked up and there it was:

I’m linking up once again at The Extraordinary-Ordinary for Just Write.

12 Crafts of Christmas {Personalized Necklace}

In October of last year, I started a little series here called “12 Crafts of Christmas” where I showcased a idea or two each of the 12 weeks prior to Christmas.  I knew I wanted to do it again this year, but when October came I wasn’t anywhere near having my act together.  I was just trying to make it to Halloween with all 4 children healthy.  (We made it!)  But I still wanted to do 12 crafts, so I have decided to do two crafts a week for the next six weeks.

Today’s craft is a little jewelry tutorial.  I did originally see this idea on Pinterest and it was linked to a tutorial.
But sometimes I see people post things that they’ve made and I think, “It can’t really be that easy, can it?”
This was one of those times, and I’m here to tell you: This is seriously easy, but it does take a little patience.

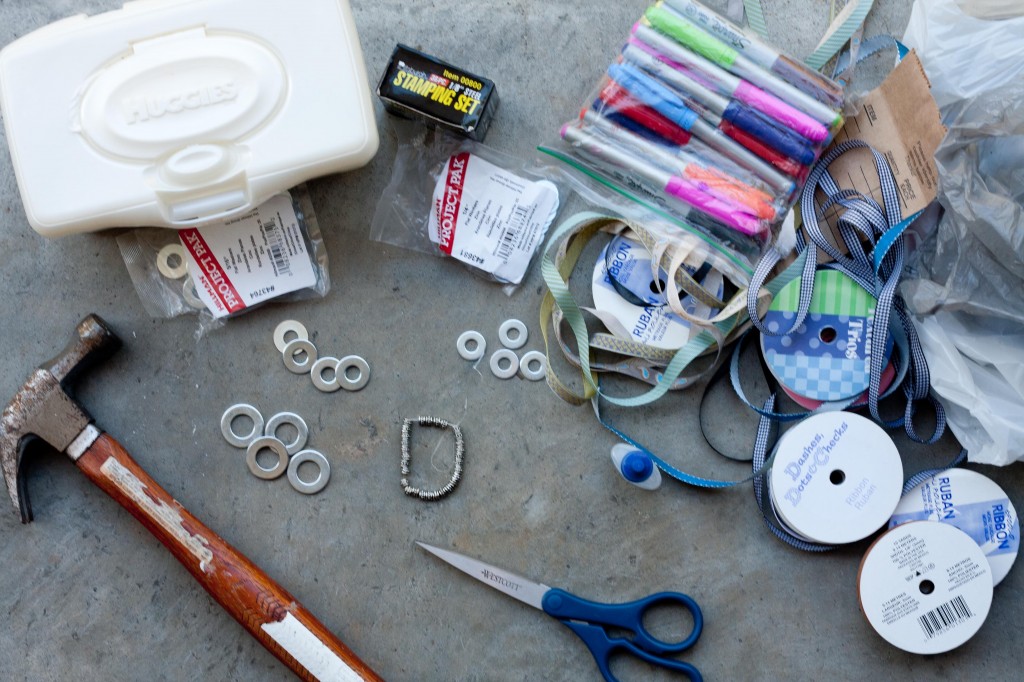
For this project you will need:
A hammer     

Ribbon

Jewelry bead

Sharpie

Wet wipes

Scissors

Fray Check

A steel stamp set like this one from Harbor Freight.

Metal Washers (I bought three sizes starting with 1/4″ and going up)


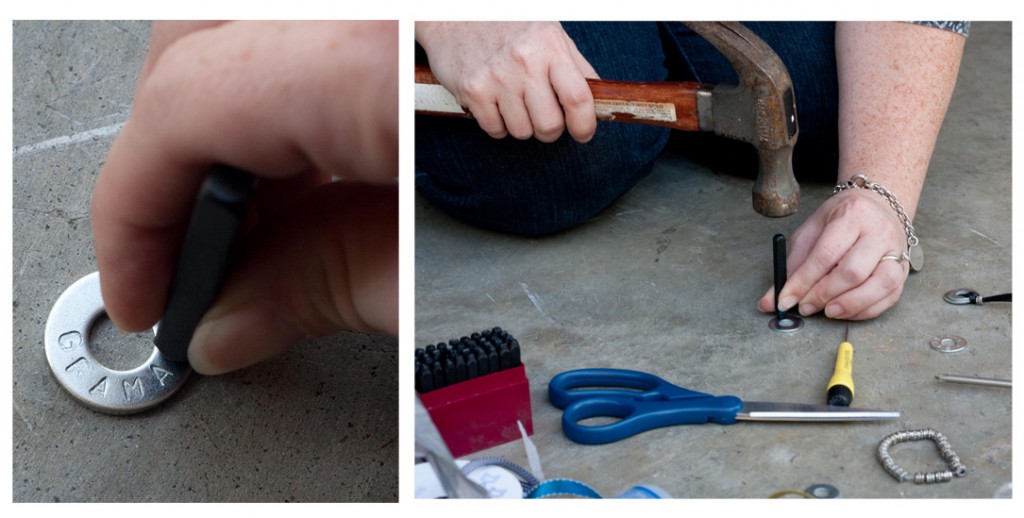
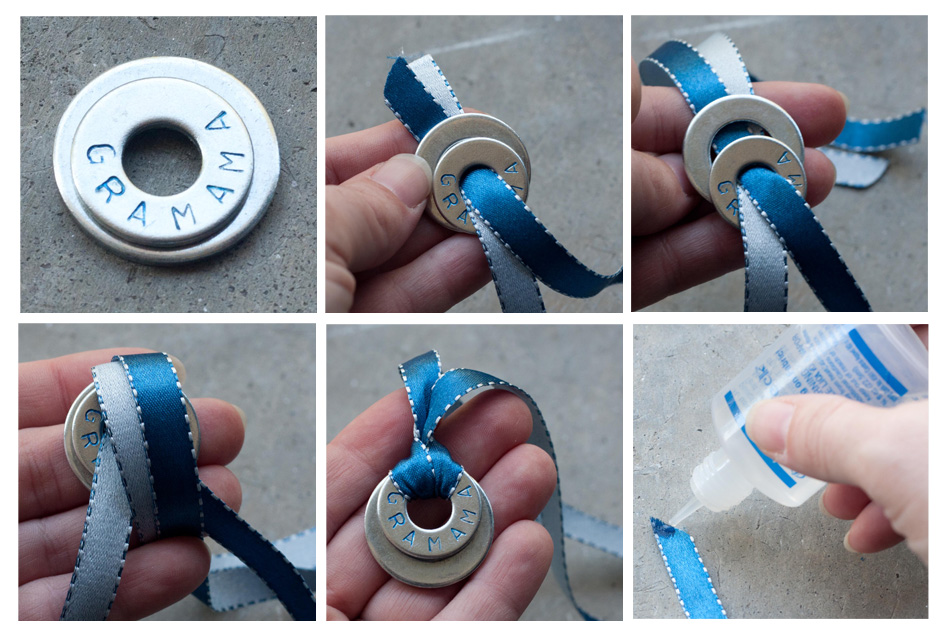
Start by placing the washer on a flat and sturdy surface.
(I would not recommend doing this on your kitchen table!)
Using the letters of the stamp set, carefully hammer in the letters you want to use.
(Be sure that the letters aren’t facing backwards before you hammer!)

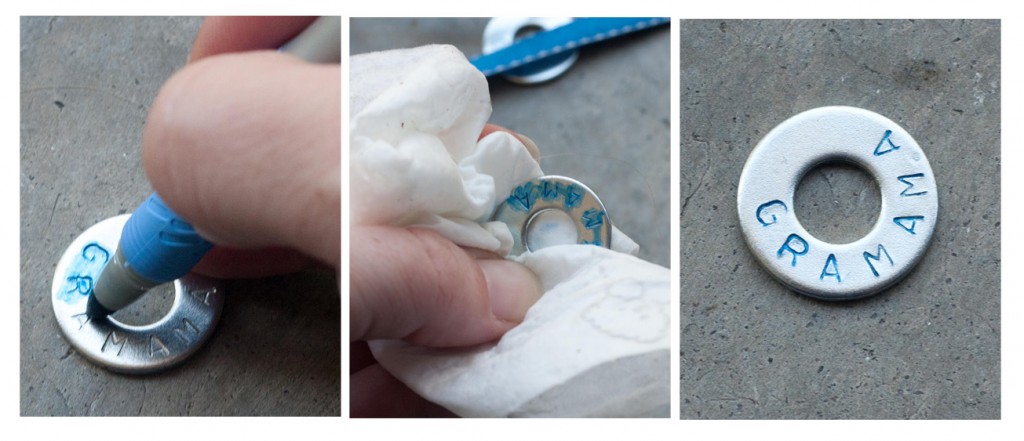
Once you are finished hammering, use a Sharpie to color over the letters.
Make sure the ink gets down into the grooves.
Before it gets too dry, gently wipe off the excess with a wet wipe.

Thread the ribbon through the washer(s) from front to back (as shown).
Push the ribbon through the hole created and tighten.
Add jewelry bead to secure the spot of the knot.
Trim the ends of the ribbon and then use FrayCheck to keep it from unraveling.

For these necklaces, I simply tie a bow in the back.
But if you really wanted to, you could easily add a clasp.

See, wasn’t that easy?  I will admit that I threw away several washers that I ruined at first.
It takes a little practice to get used to lining up the letters and hitting it just hard enough.
Over all, it took me about 10 minutes to make one necklace.

***

Want a fancier version of this necklace?  Click here to see how to add a pearl.

Want to make a bird nest necklace?  Click here to find out how.

Want something with a little less sparkle?  How about these tee shirt bracelets?

*******
12 Crafts of Christmas 2011
1. Personalized Necklaces
2. Button and Lego Wall Art
3. Personalized ClipBoards
4. Fabric Covered Wire(Wall Art) 
5. Stationary
6. You & Me Books
7. Personalized Welcome Mat
8. Personalized Dessert Carrier
9. Kid’s Artwork Cup
10. Ornaments
11. Sewing Tutorials
12. Photo Display Block
Fall in Love

Whatever you are doing right now, please stop.

Walk to the nearest exit and go outside.

Breathe deeply.  Drink it in.

Let yourself be wrapped up in the golden blanket of fall.

How To Take Better Pictures

I know there are tons and tons of books and websites out there for people wanting to learn about photography.
I use a lot of those resources myself!  But I frequently get people asking me about some of the basics.
So I’m going to do a little photography post every now and then to answer some of those questions.
I’m not getting technical here, folks.  I’m talking basics.
(Like you can use a point & shoot camera or even your phone kind of basics.)

So…here’s a picture of a pretty cute baby that needs to have her hair pulled up out of her eyes.

We’re in my back yard (complete with smashed up old wading pool) and I am sitting directly in front of her.

If I sit up on my knees and get slightly higher than her, I can eliminate all that junk in the background.
(Also?  This isn’t really an issue with kids, but for adults if you shoot from above, you help get rid of that double chin look.)

You’ll notice that I don’t have her in the center of the picture.
That has to do with the rule of thirds, which will make your images much more interesting.

I liked this shot, but it still wasn’t exactly what I wanted.
So I decided to take the picture vertically.
Taking a vertical shot is a great way to catch the eye’s attention,
(Plus…a lot of picture frames are vertical.)
For some reason, people often forget to turn the camera sideways when they are taking pictures.

Everybody together now:  Awwww…..she’s so cuuuuute.  🙂

So those pictures are pretty nice pictures, right?
I like them how they are, but it is very rare that I share or print a picture SOOC.

I love love love Lightroom, but for your everyday picture taking, I wouldn’t want to invest in it.
So for most people I suggest using Picnik.com.

Here’s a step-by-step on how I edited in Picnik:
Under Basic Edits, I clicked Colors and bumped up the saturation just a tiny bit.
(I tend to prefer slight edits, but there are some people who pull off fabulous, funky looks.)

Then I clicked Exposure and played around with that until I was happy with it.
(For this particular picture, I slightly increase shadows and contrast.)

Then I went under Effects and added ever-the-slightest bit of vingetting.
(That is one thing you can most certainly over do!)

Then if you want to get rid of that little scratch on her nose, just go into Touch-Up.
Click on Blemish Fix, adjust your brush size and then click on the scratch.
(I will say that I typically only fix blemishes on pictures I take for others.
I like to leave the little imperfections on my kids because that’s who they really are…
always scratched up and bruised, but usually happy.)

And with those few quick edits, you have this:

Just to compare, I also edited the same picture in Lightroom.
It has a totally different feel, doesn’t it?

If I had to choose one thing to do differently, I would have turned her around.
She’s sitting with the light source behind her and it’s casting some shadows that I don’t really like.
But if you’ve ever met Anna Alden, you know that she doesn’t care what you want her to do.  🙂

So that’s a quick peek into how I take pictures.
Is there something else that you’d like to hear more about?
Your question may be my next post!  🙂

Little Boy, Big Heart

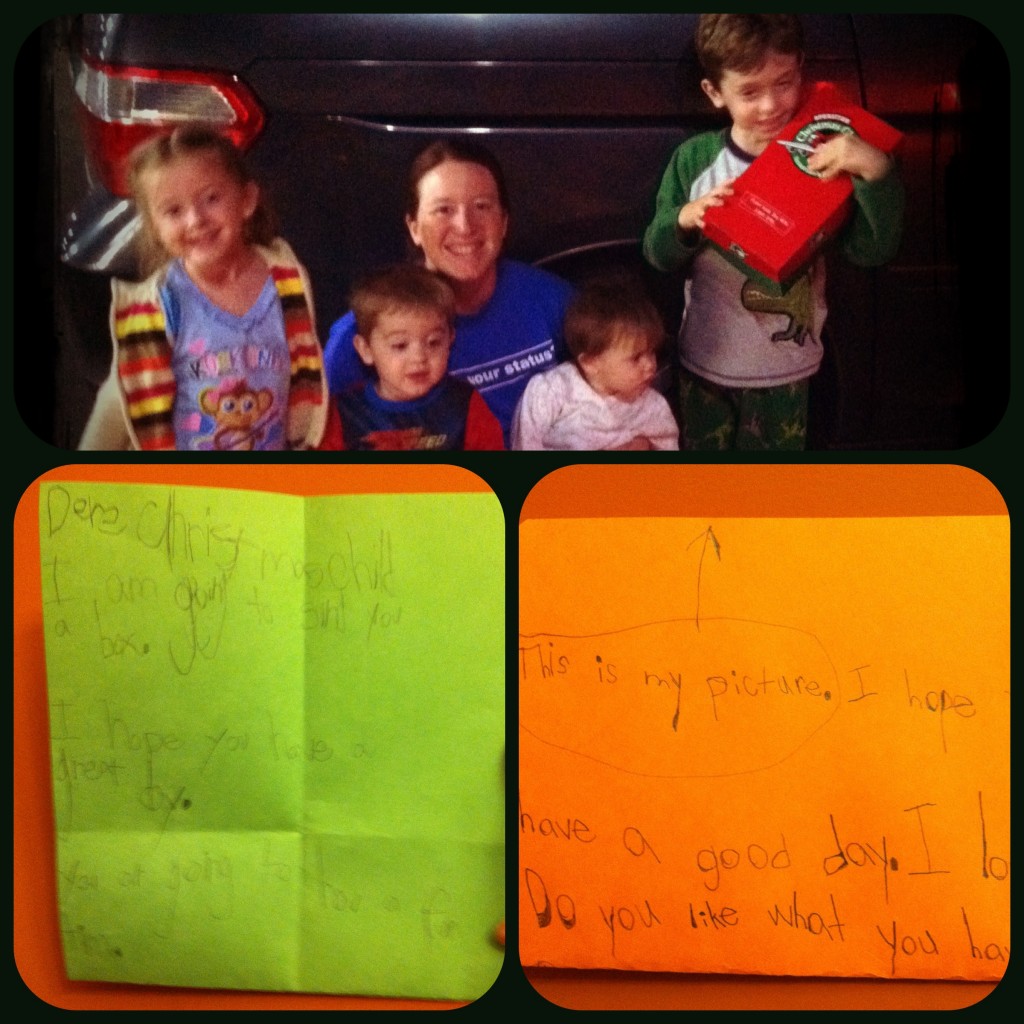
Every year, the real start of the Christmas season for me is packing up our Operation Christmas Child boxes.
Before we had kids it was fun but now that the kids are able to help out, it’s a blast!
We pick out appropriate items and talk about how a little boy or girl will use it.
We talk about helping others and sharing our resources.
We talk about being grateful for all that we have.
(As usual, I learn more from them than they from me.)

****

Our elementary school had a fundraiser selling sodas.
Due today, I sent in our form and money for two cases.
When Carter got home, I found the form and money still in his folder.
At dinner I told Marshall about it and said I’d just send it tomorrow and see if they would take it.
My little boy with a big heart suggested that we just use the money for Operation Christmas Child.

****

****

His letter:
This is my picture. ↑
I hope you have a great day.
I love you.
Do you like what you have now?

****

Her letter:

Dere Christmas child,
I am going to sind you a box.
I hope you have a great day.
You ar going to hav a fun tim.

****

Oh, how I love my children.

****

I’m linking up once again at The Extraordinary-Ordinary for Just Write.